RANO2.0-assist
The RANO2.0-assist is an interactive tool for Response Assessment in Neuro-Oncology (RANO). It is based on the RANO 2.0 guidelines and is designed to assist in the evaluation of glioma. The tool is implemented as a 3D Slicer extension and provides a user-friendly interface for annotating and measuring tumor response in MRI scans. The pipeline includes the following steps:
Automatic Segmentation: The tool uses deep learning models to automatically segment the tumor regions in the MRI scans.
Lesion Matching: Lesions are matched across different time points to assess changes longitudinally.
Automatic 2D Measurements: The tool provides automatic measurements of the segmented tumor regions, including the calculation of the bidimensional product.
Manual Adjustments: Users can manually adjust the automatically placed line pairs, add new line pairs, and remove unwanted ones.
Response Assessment: The tool provides a summary of the measurements and allows users to assess the response according to the RANO 2.0 guidelines, considering the bidimensional product as well as clinical criteria such as steroid use and clinical status.
Report creation: The tool generates a report summarizing the measurements and response assessment, which can be saved in PDF format.
Installation
System requirements
Operating System: The tool has been tested on Ubuntu 24.04 and Windows 11
GPU: The tool requires a GPU with CUDA support for the automatic segmentation. The tool has been tested on NVIDIA GPUs with CUDA 12.4.
Download the repository
The repository can be downloaded from GitHub:
Segmentation models and test data
Due to the larger file sizes, the segmentation model weights and test data are not part of the GitHub repository and will be automatically downloaded when the RANO module is first opened.
Alternatively, they can be downloaded from
https://zenodo.org/records/15411078
(direct download link: click here )
The directories data and dynunet_pipeline contained in the download have to be merged with the respective directories of same
name in the rano2.0-assist root directory:
This will add the following directories (and further subdirectories) to the root directory of the repository:
└── rano2.0-assist  # root directory of the repository
    ├── data
    │   └── test_data
    │       ├── KCL
    │       │   └── Patient_003
    │       └── MU-Glioma-Post  # https://www.cancerimagingarchive.net/collection/mu-glioma-post/
    │           ├── PatientID_003
    │           └── PatientID_005
    └── dynunet_pipeline
        └── data
            └── tasks
                ├── task4000_brats24
                └── task4001_brats24allmod
Note: if the replace files dialog appears for the .gitignore file, either keeping the existing file or replacing it with the new one is fine (they are identical).
3D Slicer extension
RANO2.0-assist can be installed as a local 3D Slicer extension, or it can be run in a Docker container. The Docker container includes all the necessary dependencies and can be run on any machine with Docker installed that supports GPU acceleration. The local installation requires 3D Slicer and the necessary Python packages to be installed.
Installation with Docker (Linux only)
Requirements
nvidia-container-toolkit (https://docs.nvidia.com/datacenter/cloud-native/container-toolkit/latest/install-guide.html)
The NVIDIA Container Toolkit is a collection of libraries and utilities enabling users to build and run GPU-accelerated containers.
After installing nvidia-container-toolkit, restart the Docker daemon, for example use:
sudo systemctl restart docker
To validate that the installation was successful, run the following docker command:
sudo docker run --rm --runtime=nvidia --gpus all ubuntu nvidia-smi
This should display the output of the
nvidia-smicommand.Manage Docker as a non-root user (https://docs.docker.com/engine/install/linux-postinstall/)
Alternatively, modify the following docker scripts so that the docker commands are run with
sudo.
docker build
The following commands should be run in the root directory of the repository (where the docker directory is located).
Make sure the docker/docker_build.sh script can be executed:
chmod +x docker/docker_build.sh
Run the docker/docker_build.sh script.
./docker/docker_build.sh
This will build the Docker image. The image will be built using the
Dockerfile in the docker directory. Building the image may take a 10-20 minutes, depending on your system and internet connection.
docker run
Make sure the docker/docker_run.sh script can be executed:
chmod +x docker/docker_run.sh
Run the docker/docker_runs.sh script.
.docker/docker_run.sh
This will run the Docker container with the RANO2.0-assist tool. The container will start 3D Slicer and the RANO module
will be started automatically. The container will also mount the data directory,
allowing you to access the data in it from within Slicer. It will also mount the Reports directory to save the reports
generated by the tool.
Local installation
Software requirements
Follow the links to install the required software:
3D Slicer (tested with version 5.10.0)
PyTorch Extension
Next, the PyTorch extension needs to be installed within 3D Slicer. This extension facilitates the installation of PyTorch in 3D Slicer.
Open 3D Slicer
Open the Extension Manager: “View” –> “Extension Manager”
Install the PyTorch extension: “Install Extensions” –> “Utilities” –> “PyTorch”
Restart 3D Slicer
Add the RANO2.0-assist extension to 3D Slicer
To add the extension to 3D Slicer, follow these steps:
Enable developer mode: “Edit” –> “Application Settings” –> “Developer” –> “Enable developer mode”
Open 3D Slicer and select “Developer Tools” –> “Extension Manager” in the Modules drop down menu or search for “Extension Manager” using the search tool.

In the Extension Manager, click “Select Extension” and select the “rano2.0-assist” repository folder.
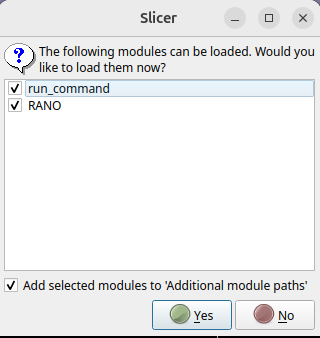
Confirm the import of the two modules.
Start the RANO module by selecting “Tools” –> “RANO” in the Modules drop down menu or search for “RANO” using the search tool.
Opening the module for the first time may take several minutes, since it installs various Python libraries (listed below) automatically.
Python libraries
The following libraries will be installed when the RANO2.0-assist module is first loaded:
numpy==2.0.2
scikit-image==0.24.0
numba==0.60.0
nibabel==5.3.2
tqdm==4.67.1
pyyaml==6.0.2
reportlab==4.4.1
torch  # version determined by PyTorch extension
git+https://github.com/aaronkujawa/MONAI.git@rano
pytorch-ignite==0.5.2
tensorboard==2.19.0
antspyx==0.5.4
hd-bet==2.0.1
Running tests
Add Slicer to Your PATH
To run the tests, please make sure that the Slicer binary is in your PATH environment variable.
Linux
The Slicer binary is located in the 3D Slicer installation folder, for example:
/home/username/bin/Slicer-5.10.0-linux-amd64/Slicer)
Add it to your PATH
Add this line to your
~/.bashrc:export PATH=/path/to/Slicer-folder:$PATH
Reload your shell:
source ~/.bashrc
Windows
The Slicer.exe binary is located in the 3D Slicer installation folder, for example:
C:\Program Files\Slicer <version>\Slicer.exe
Add it to your PATH
Open Environment Variables by searching for “env” in the Start menu and selecting “Edit the system environment variables”
Edit the Path variable under System variables
Add the folder containing
Slicer.exe
Open a new Command Prompt and verify:
Slicer --version
Alternatively, you can include the path to the Slicer binary in the tests/run_tests.sh script, by adding it to the SLICER_EXECUTABLE_PATHS variable.
Run the tests
To test the docker installation, run this script located in the repository at tests/run_tests_docker.sh
To test the local installation, run the script tests/run_tests.sh
Both scripts will start 3D Slicer and run the tests listed in run_tests.sh. By default, one test runs on DICOM input data and another test runs on NIfTI input data. The tests are define in RANO/utils/test_rano.py.
The tests will take a few minutes to run and will create tests in the Reports directory.
Upon successful completion, the script prints:
Test Summary:
Test test_RANO_dicom_KCL: PASSED
Test test_RANO_nifti_MU: PASSED
Usage
Running the tool
Start 3D Slicer
Start the RANO module by selecting “Tools” –> “RANO” in the Modules drop down menu or search for “RANO” using the search tool
Loading the image data
1. Loading the test data
Loading the test data ist only available in developer mode. To enable developer mode, go to the “Edit” menu and select “Application Settings”.
Under “Developer” tab, check the “Enable developer mode” checkbox. Restart of 3D Slicer is required.
At the top of the RANO module, you will find the “Reload & Test” box, which is for developer use only.
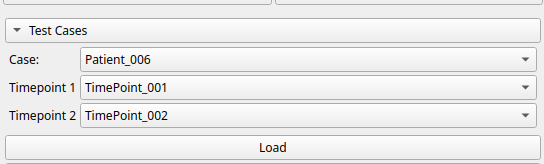
The “Test Cases” box allows you to load the test data saved under `data/test_data/KCL’ in the repository.
Select the patient and time points in the Test Cases Box and click “Load” to load the data.
This will load all required scans in the “Inputs” box
2. Loading your own data
Drag and drop the MRI scans onto the 3D Slicer window. 3D Slicer will open a dialog to load the images.
Alternatively you can follow the “Add Data” or “Add Dicom Data” buttons in the “Add Data” box.
After the images are loaded, select the volumes in the “Inputs” box. Note that all visible input channels are required for automatic segmentation. The number of input channels is determined by the segmentation model that is selected in the “Automatic Segmentation” box. The default model “task4001” requires 4 input channels:
T1c (T1 contrast enhanced)
T1 (T1 native)
T2f (T2 flair)
T2 (T2)
The other model “task4000” requires T1c only.
Automatic segmentation
Automatic segmentation: make sure the “Affine registration” checkbox is checked and the “Input is skull-stripped” checkbox is checked if the input images have been skull-stripped already. For both timepoints, select the model “task4001”. The output segmentations by default are called “Segmentation_t1” and “Segmentation_t2”, but the user can also “Create new segmentations” under the dropdown menu.
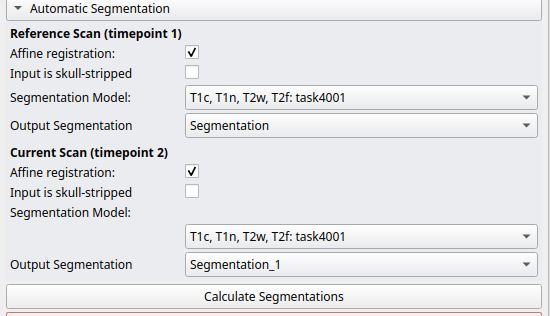
Click “Calculate Segmentation” to run the segmentation model.
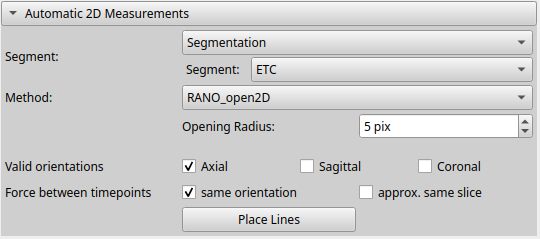
In the “Automatic 2D Measurements” box choose one of the predicted segments into which the orthogonal line pairs are to be placed. By default, the enhancing segment (ETC) is selected.
Choose the method. Currently the following methods are available:
RANO: No postprocessing of the segmentation. The method returns the line pairs that maximize the bidimensional product for each connected component of the selected segment.
RANO_open2D: A postprocessing is applied to “clean” the segmentation. A morphological opening with a circle of user-defined radius is applied along all 3 axes separately, and the union of the resulting segments is used as the new target area for the line pairs. Note: If the opening operation results in the splitting of a connecting component into multiple components, only one line pair is placed in that component in which the maximum bidimensional product is found.
RANO_open3D: A postprocessing is applied to “clean” the segmentation. A morphological opening with a sphere of user-defined radius is applied (once in 3D). The resulting segment is used as the segment for the line pairs.
Choose the orientations along which the line pairs are to be placed. The default is “axial”. The user can also choose multiple orientations. The line pairs are then placed in that orientation in which the maximum bidimensional product is found.
The “same orientation” checkbox assures that line pairs in the second timepoint are placed in the same orientation as in the first timepoint.
The “approx. same slice” checkbox assures that line pairs in the second timepoint are placed in approximately the same slice as in the first timepoint. Note: This frequently leads to a slice of larger tumor extent to be missed in the second timepoint and should be used with caution.
Click “Place Lines” to automatically place the line pairs.
Manual adjustments of the line pairs
The line pairs can be adjusted manually by clicking on the line pair control points and dragging them to the desired position.
Changing the line pairs will automatically update the response classification further below in the GUI
Current line pairs are shown in the “Current Line Pairs” box.
The segmentation of the selected segment (after postprocessing) can be shown/hidden by clicking on the “Show/Hide Lesions” button
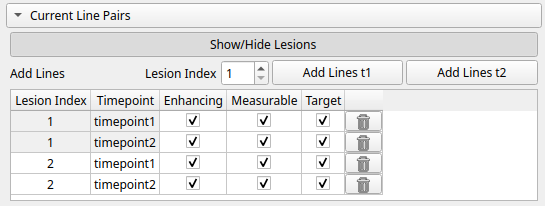
Line pairs can be removed by clicking on the “Trash” icon
New line pairs can be added by clicking on the “Add Lines t1” or “Add Lines t2” buttons. The lesion index has to be specified in the spin box next to the buttons.
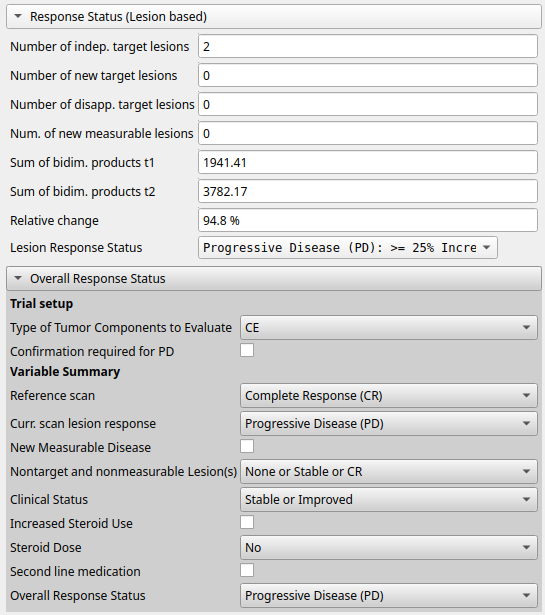
Response Status and Overall Response Status
The initial response status based solely on the line pairs is shown in the “Response Status” box.
The overall response status is shown in the “Overall Response Status” box and is additionally based on the clinical criteria (steroid use and clinical status) that need to be specified by the user.
Report creation
The report can be created by clicking on the “Create Report” button in the “Report” box.
A dialog will open to specify the report directory
Other
The “External Python Path” box allows the user to specify the path to a different python environment for the segmentation pipeline.
If the specified path is not valid, the Slicer python environment will be used as a fallback.
Community guidelines
We welcome contributions, bug reports, and questions from the community.
Reporting issues
Please report bugs, problems, or feature requests via GitHub Issues.
When reporting an issue, please include: a minimal example that reproduces the problem,
your operating system and Python version, and any relevant error messages or output.
More detailed error logs can be obtained by setting debug = True in RANO/utils/config.py.
Getting help
Questions about how to use the software can be asked by opening a GitHub issue.
Please describe what you are trying to do and include any relevant code or data snippets.
Contributing
Contributions are welcome, including bug fixes, documentation improvements, and new features.
To contribute:
Fork the repository on GitHub.
Create a new branch for your change.
Make your changes and add or update tests if appropriate.
Open a pull request describing what you have changed and why.
For larger changes, please open an issue first to discuss the proposed idea.
All contributions should follow standard good practice for scientific software: code should be clear, tested where possible, and documented.